Description #
Okay, the title is a mouthful, but the result of using an ANSI-compatible terminal and sending ANSI Escape Sequences gives our projects multi-color output – no more boring, monochrome displays. Using color in a terminal can be very useful as color can provide a visual indication of status more quickly than interpreting a value.
First things first: We need to use an ANSI-compatible terminal in place of PST. The code for this example has been tested on Windows using PuTTY and Tera Term. It also runs in the default terminal used by the FlexProp compiler (also tested on Windows).
What are ANSI Escape Sequences? They are special strings of characters that begin with Escape (hex $1B) and an open bracket (“[“) that command a compatible terminal to go beyond basic printing. For example, this line…
term.str(string("Hello!, from the Propeller 2"))…will display in any terminal. What if we wanted that line of text to be bright cyan? Using an ANSI Escape Sequence and compatible terminal, we can make that happen. Have a look at this modification.
term.str(string($1B, "[96mHello!, from the Propeller 2")) And this is the result on an ANSI-compatible terminal (PuTTY for Windows).
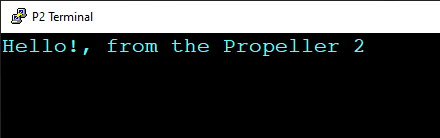
The output is beautiful, but the code… not so much. The problem with ANSI Escape Sequences is that they can make our code look messy, and by hand-coding we have to continually look up the codes (in this case “96m” for bright cyan text).
This issue is easily overcome an object. To simplify the use of ANSI Escape Sequences we’ll use jm_ansi.spin2. Each of the methods in this object returns a pointer to a string which means we can use that pointer in any string-compatible method. If you’re using jm_fullduplexserial.spin2 you have two choices: 1) standard string or, 2) formatted string.
Here’s how we modify the code above using the ANSI object with simple string methods.
  term.str(ansi.fgnd(ansi.BR_CYAN))
  term.str(string("Hello!, from the Propeller 2"))
We can also use a formatted string like this.
term.fstr1(string("%sHello!, from the Propeller 2"), ansi.fgnd(ansi.BR_CYAN))In the second case we’re using the fstr1() method because we need to pass one parameter into the formatted string (the ANSI Escape Sequence for bright cyan). The %s in our main string is the placeholder for the Escape sequence.
It may seem like a little more typing, but it’s certainly a lot less wondering about what the code is doing, and it’s much easier to modify.
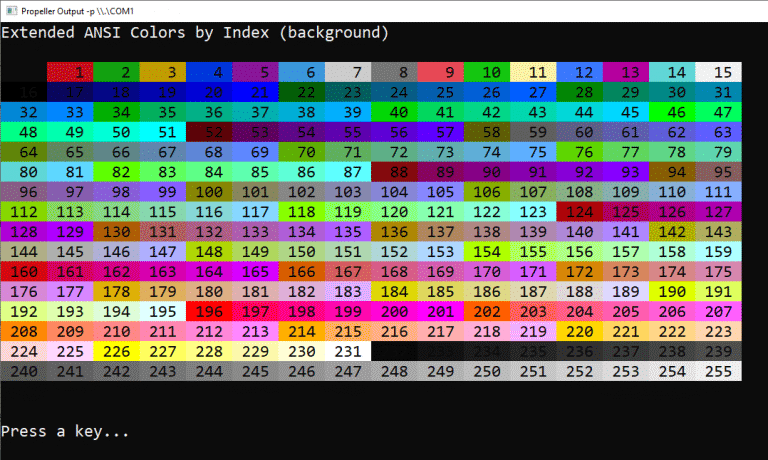
The ANSI object allows us to control foreground or background colors by name (as we saw above), or by index (0..255). For example, here is the display of all color indexes when used for background (FlexProp terminal in Windows).
In addition to changing text foreground and background colors, we have screen and cursor management. This method (part of the demo) will clear the terminal and lets us determine if the cursor is visible or not.
pub clear_screen(crsr)

'' Move cursor home (upper left) and clear the terminal
'' -- crsr specifies cursor visibility (0 for off, !0 for on)

  if (crsr)
    term.str(ansi.show_cursor())
  else
    term.str(ansi.hide_cursor())

  term.str(ansi.home())
  term.str(ansi.cls())
For custom displays we can position the cursor to any location. For example, if the program output needs to be placed at the tenth column of the third line, we would do this:
term.str(ansi.crsr_xy(9, 2) )Note that the column and lines of the display are zero-indexed, so we use 9 and 2, not 10 and 3.
There are number of useful methods in jm_ansi.spin2 that can improve your test-based displays – and all of them are sent to the terminal using a string method as illustrated above.
Terminal Considerations
To use the jm_ansi.spin2 object you will need your terminal set to ANSI mode; this is often called VT100 mode in terminal programs. To keep things somewhat compatible with PST, enable your terminal to add a carriage return when it receives a linefeed (this is a common configuration option in terminals).
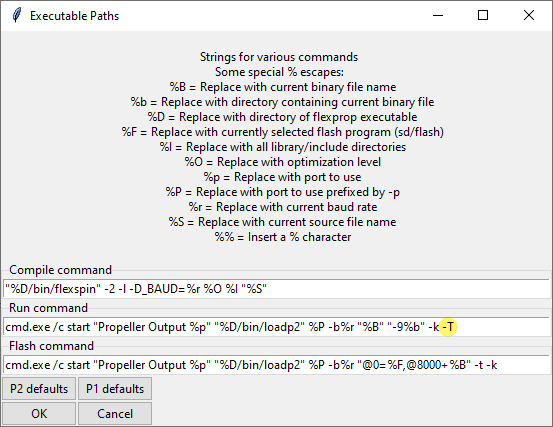
Finally, if you’re using the FlexProp compiler and built-in terminal, you’ll need to add the -T option to the end of the Run command options. You can get to this via Commands\Configure Commands…
The important thing now is to explore and experiment. Whenever you get a new object, give yourself permission to play with it so that you can have fun while learning, instead of being under the pressure of a looming project deadline.
Parts Used #
- Any Propeller 2 Board
Source Code #
Programming Language #
Tools and Operating System #
- Propeller Tool for Windows
- FlexProp


