Skip to content
  • Home
  • Account
  • Restricted content
  • OBEX
  • Chips Tips
  • Logout
  • Shop
  • QuickBytes
Propeller OBEX
  • OBEX
  • Forum
Login
Propeller OBEX

Propeller 2

  • Configuring Visual Studio Code for Programming the P2 on Mac, Windows, and Linux
  • Breakout Board Options for P2 Edge Modules
  • Solar Panel Monitoring Demo (Intro to Using Video 3 of 3)
  • Wireless Programming with the ESP8266 WX Module
  • Brushless DC Motor Control Demo
  • Colorful Terminal Output with ANSI Escape Sequences
  • XBee RF Transparent and API Mode Demo
  • DS3231 Real Time Clock I2C Demo
  • Multiple Servo Control (up to 64) Object
  • Multiple Serial Port (8 UART – 16 Tx/Rx) Object
  • Goertzel Operation with Ultrasonic Transducers
  • Web Page Control of WS2811 LEDs Using the IoT Gateway on Raspberry Pi
  • 320×240 LCD Driver for ILI9341 Controller and XPT2046 Touch Screen
  • Digital Sample ADC to DAC + Analog Frequency to DAC
  • Using Smart Pins to Measure Frequency Output of TSL235R Light-to-Frequency Sensor
  • Ping))) Ultrasonic Distance Sensor with Graphical Debug Demo
  • Simple Analog Input
  • P2 Edge 16 MB Flash Reader and Explorer Utility
  • LED Matrix used as an I/O Test Utility
  • Arlo Conversion to P2 with the Universal Motor Controller
  • Five Buttons On One Pin
  • P2 RTC Add-on Board Demo
  • Simple Video Driver – Using Images (Intro to Using Video 2 of 3)
  • Starting Your P2 Project with a Spin2 Template
  • E-Ink Display Demo
  • MAX7219 LED Display SPI Demo
  • DHT11, DHT22, CM2302 Humidity and Temperature Sensor Object
  • NMEA GPS String Parsing
  • Floating Point Math: DEBUG and Terminal Display Example
  • LEDs – Beyond the Basics
  • Quadrature Encoder Object
  • P2 RTC Add-on with GPS Module
  • DVI/VGA Text Driver Demo
  • PCF8574 I2C LCD Demo
  • Simple Sound Engine Demo
  • 1-Wire Driver with DS18B20 Temperature Sensor Demo
  • Send Email from the Propeller 2 Using the IoT Gateway on Raspberry Pi
  • I2C Device Bus Scanner Utility
  • 32-Channel ADC Object
  • Tetris
  • Video Hardware with Character Map Demo (Intro to Using Video 1 of 3)
  • WS2811, WS2812, WS2812b, WS2813, SK6812x NeoPixel Object
View Categories
  • Home
  • Docs
  • Quick Bytes
  • Propeller 2
  • Starting Your P2 Project with a Spin2 Template

Starting Your P2 Project with a Spin2 Template

Reading Time: 1 min read

Description #

It’s common for writers – fiction, non-fiction, and even code writers – to be excited about starting a project only to become paralyzed by a blank screen on opening their editor. I help myself past this initial hurdle by starting every project with a template. My template provides the basic framework of a generic program that helps me get out of the blocks a little faster. The organization of the template directs my creativity to the task at hand.

If you don’t have your own template you can start with the one included here. Download and extract the files from the P2 Template zip, available below under Source Code. Move the file called p2_template.spin2 to the Propeller Tool\Templates folder. Move the other files to the Propeller Tool\Library folder. As of version 2.4.x, there is a Propeller Tool folder under Documents; you can find the Templates and Library folders under that.

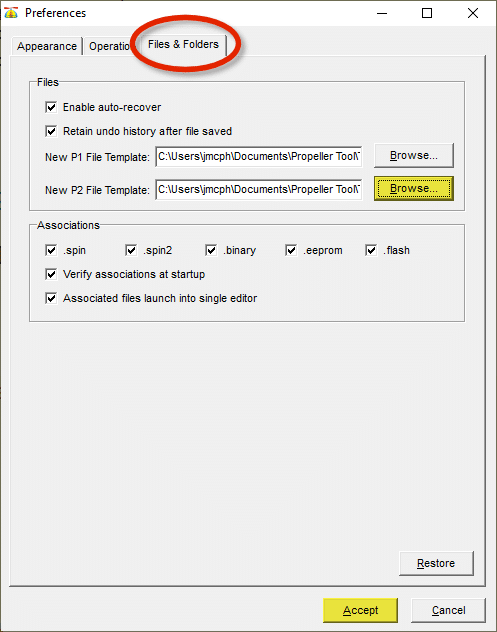
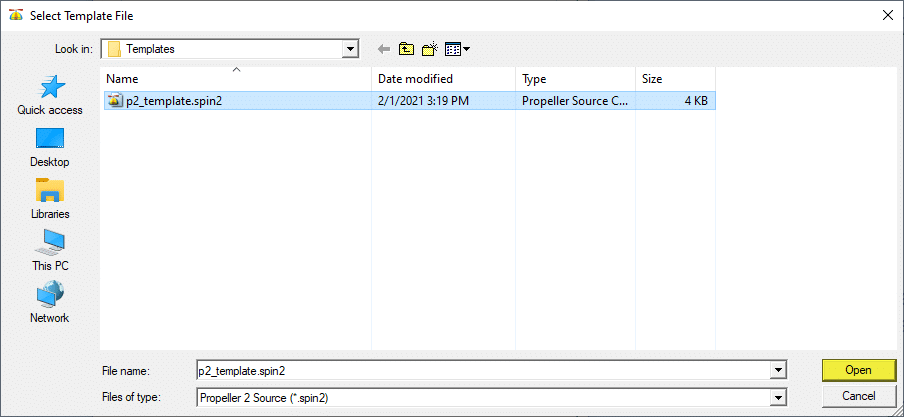
Propeller Tool makes it easy to specify a starting template for new projects. Press the F5 key (or click on Edit\Preferences…) to open the Preferences dialog. Now click on the Files & Folders tab. Click on the Browse button and navigate to your Templates folder using the Select Template File dialog. Select the desired template file, then click on Open to return to the Preferences dialog. Finally, click Accept on the Preferences dialog and the template will be ready for use.
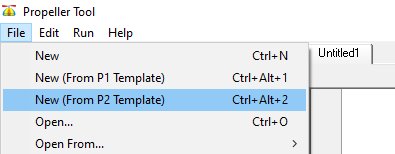
There are three ways to start a project using the template:

  1. Click File\New (From P2 Template)
  2. Use the keyboard shortcut: [Ctrl]+[Alt]+[2]
  3. Right-click on any open tab in the editor and select New (From P2 Template)

Regardless of the method used to create your file, you’ll have a new tab that will be named UntitledNN (where NN is a 1- or 2-digit number). It is a good habit to immediately update the info header at the top new file and save it with an appropriate name to a project folder (make sure the extension in the Save As… dialog is set to .spin2). The old edict still holds true: Save early, save often.
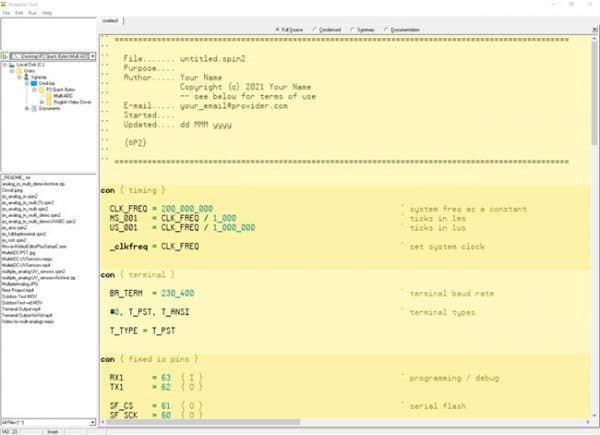
In the Summary view, the code blocks will condense. 
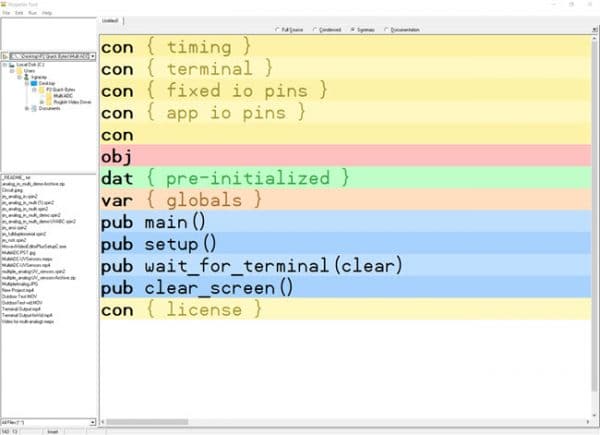
The template has a serial object attached that allows the program to send information to a terminal. As PST (Propeller Serial Terminal) is installed with Propeller Tool, the program defaults to its use. If you’re using a VT100 terminal, change the terminal type with this line:

T_TYPE = T_ANSI

The included ANSI object provides methods that simplify the use of ANSI terminals, allowing cursor control and colorful text output from your programs.

Now that you’re no longer staring at a blank page, it’s time to create something fantastic with the incredible P2!

Parts Used #
  • Any Propeller 2 board
Source Code #
  • P2 Template
Programming Language #
  • Spin 2
Tools and Operating System #
  • Propeller Tool for Windows
Additional Resources #
  • Propeller 2 Spin Documentation
Document Author #
  • Jon McPhalen
Source Code Author #
  • Jon McPhalen
Was this useful ?

Share This Article :

  • Facebook
  • X
  • LinkedIn
Still stuck? How can we help?

Still stuck? How can we help?

Updated on September 29, 2026
Simple Video Driver – Using Images (Intro to Using Video 2 of 3)E-Ink Display Demo
Table of Contents
  • Description
  • Parts Used
  • Source Code
  • Programming Language
  • Tools and Operating System
  • Additional Resources
  • Document Author
  • Source Code Author

Copyright © 2026 - Parallax Inc.
599 Menlo Drive | Rocklin, CA 95765 | USA